Disclosure: This post contains affiliate links. If you use these links to buy something we may earn a commission. As an Amazon Associate I earn from qualifying purchases.
A good cheese board isn’t about how much cheese you pile on. It’s about picking a few that are different from each other, serving them at the right temperature and giving people what they need to eat them. Here’s how to build one, how much to buy, and the few pieces of gear that make it easier.
How much cheese to buy
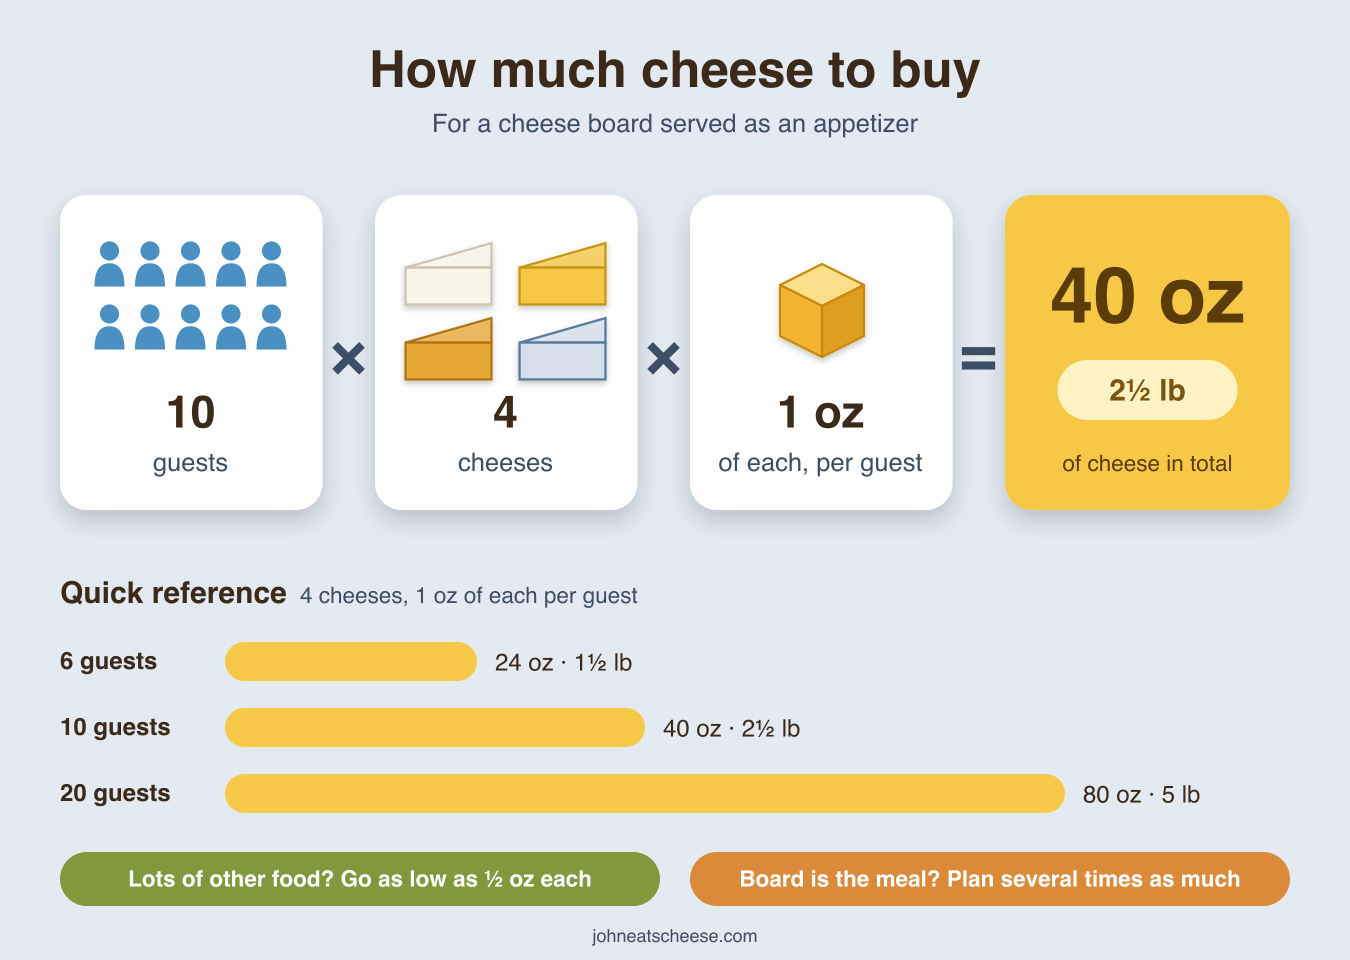
If the board is an appetizer, plan on about half an ounce to an ounce of each cheese per guest. That’s the rule of thumb from Dairy Farmers of Wisconsin, as quoted in The Takeout. If the board is the meal, plan on several times that.
For example, four cheeses for ten guests at an ounce each is 40 ounces, or two and a half pounds of cheese in total. Round down if there’s a lot of other food, and round up if your friends really like cheese. For more on getting the amount right, see Hosting: How much cheese should I buy?
Pick three to five cheeses
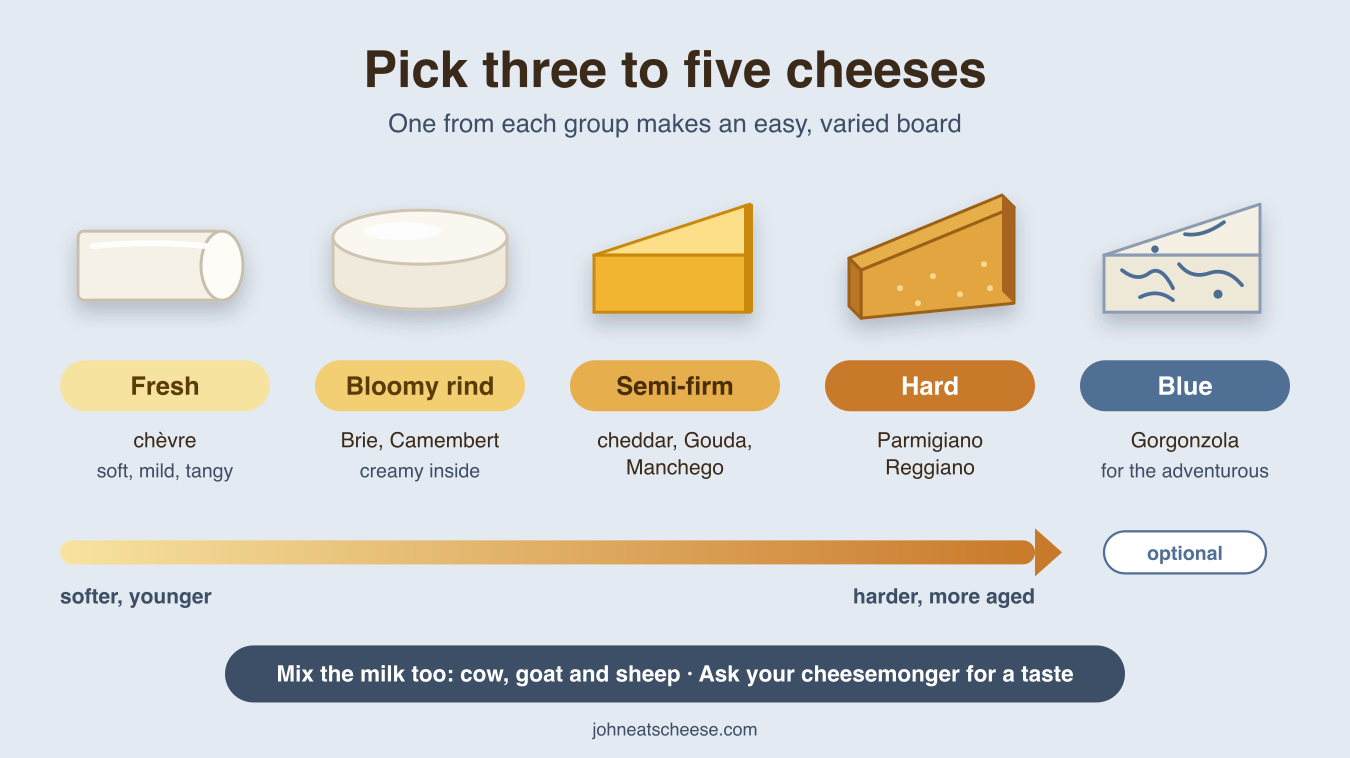
More than five and people stop tasting and start grazing. The trick is variety: mix the milk (cow, goat, sheep) and the texture. One from each of these groups is an easy place to start:
- Fresh or soft: a fresh goat cheese like chèvre.
- Bloomy rind: Brie or Camembert.
- Semi-firm: a cheddar, Gouda or Manchego.
- Hard: an aged cheese like Parmigiano Reggiano.
- Blue (optional): Gorgonzola or another blue, for the adventurous.
Not sure what to pick? Ask a cheesemonger. Tell them how many people you’re feeding and your budget, and ask for a taste. That’s what they’re there for.
Build the board
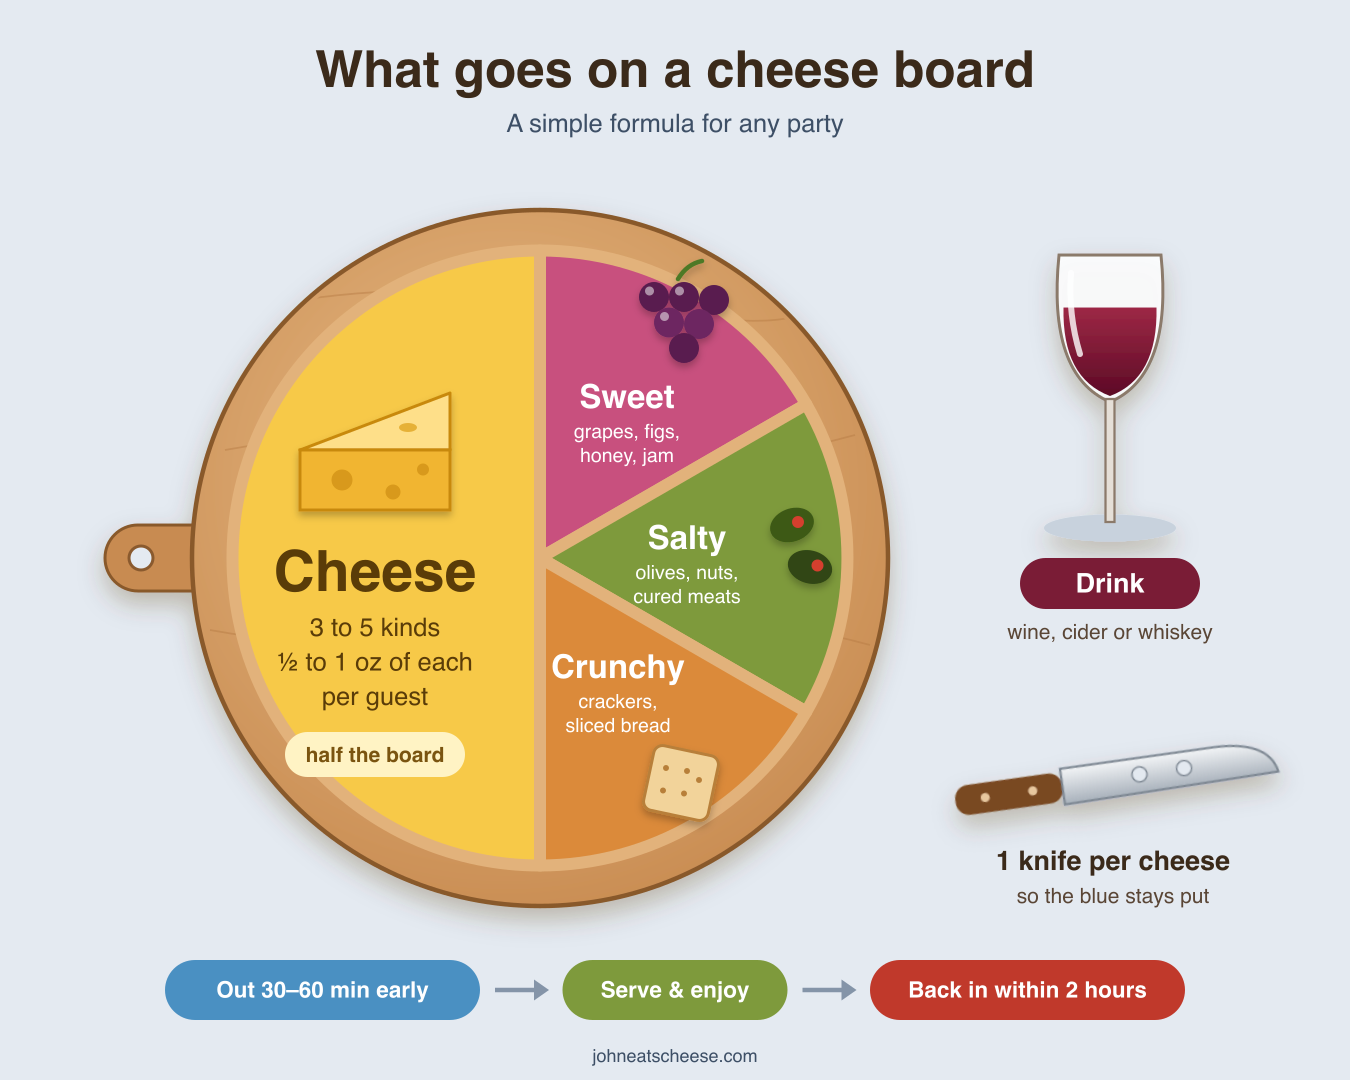
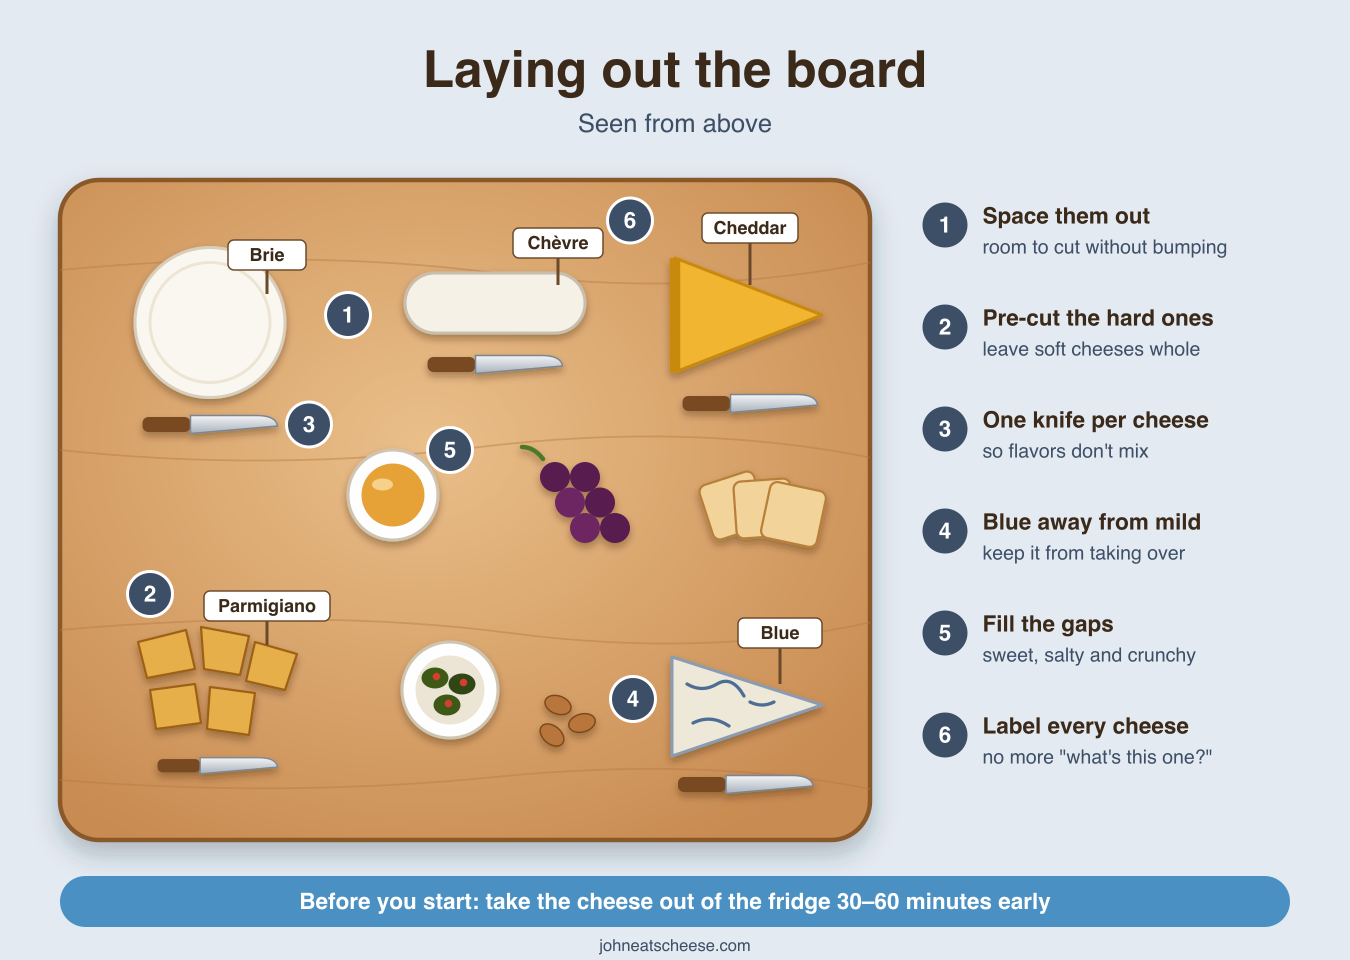
- Take the cheese out early. Cold cheese tastes muted. Give it 30 minutes to an hour out of the fridge, and keep it wrapped until you plate it so it doesn’t dry out.
- Space the cheeses out. Put them around the board first, with room between them, so people can cut without bumping into each other. Keep the blue away from the mild ones.
- Pre-cut the hard cheeses, leave the soft ones whole. A wedge of Parmigiano goes faster in pieces. Guests can slice into a Brie themselves (just don’t cut off the tip). See How to cut cheese for the rest.
- Give each cheese its own knife. Otherwise the blue ends up on everything.
- Fill the gaps. Something sweet (grapes, figs, apple slices, honey or jam), something salty (olives, nuts) and something crunchy (bread or crackers). Cured meats are optional.
- Label everything. A small card or marker with each cheese’s name saves you from answering “what’s this one?” all night.
Plan your own board
Answer five quick questions and get a plan: how much of each cheese to buy, what to drink with it and a shopping list. The amounts follow the rule of thumb above.
What you need
You don’t need much, and you probably own some of it already. If you’re shopping, here’s what to look for.
- A board. Wood is the classic and is easy on your knives. Marble and slate look great, and you can write cheese names right on slate with chalk. Pick one big enough to leave space between the cheeses. Browse cheese boards (Amazon)
- A cheese knife set. A basic set covers soft, semi-firm and hard cheeses: a soft cheese knife, a narrow plane or flat knife, and a small pointed knife for hard cheeses. My cheese knives guide explains which does what. Browse cheese knife sets (Amazon)
- Cheese markers. Small flags, picks or chalkboard labels. Browse cheese markers (Amazon)
- Small bowls. For honey, jam, olives and nuts, so they don’t run into the cheese. Browse small bowls and ramekins (Amazon)
- A cheese dome (optional). Handy for keeping the cheese covered while it comes up to room temperature, or for keeping the bugs off outdoors. Browse cheese domes (Amazon)
Hosting this season? A free Prime trial includes fast, free delivery on eligible items. Try Prime free on Amazon Affiliate link: I may earn a commission.
How long it can sit out
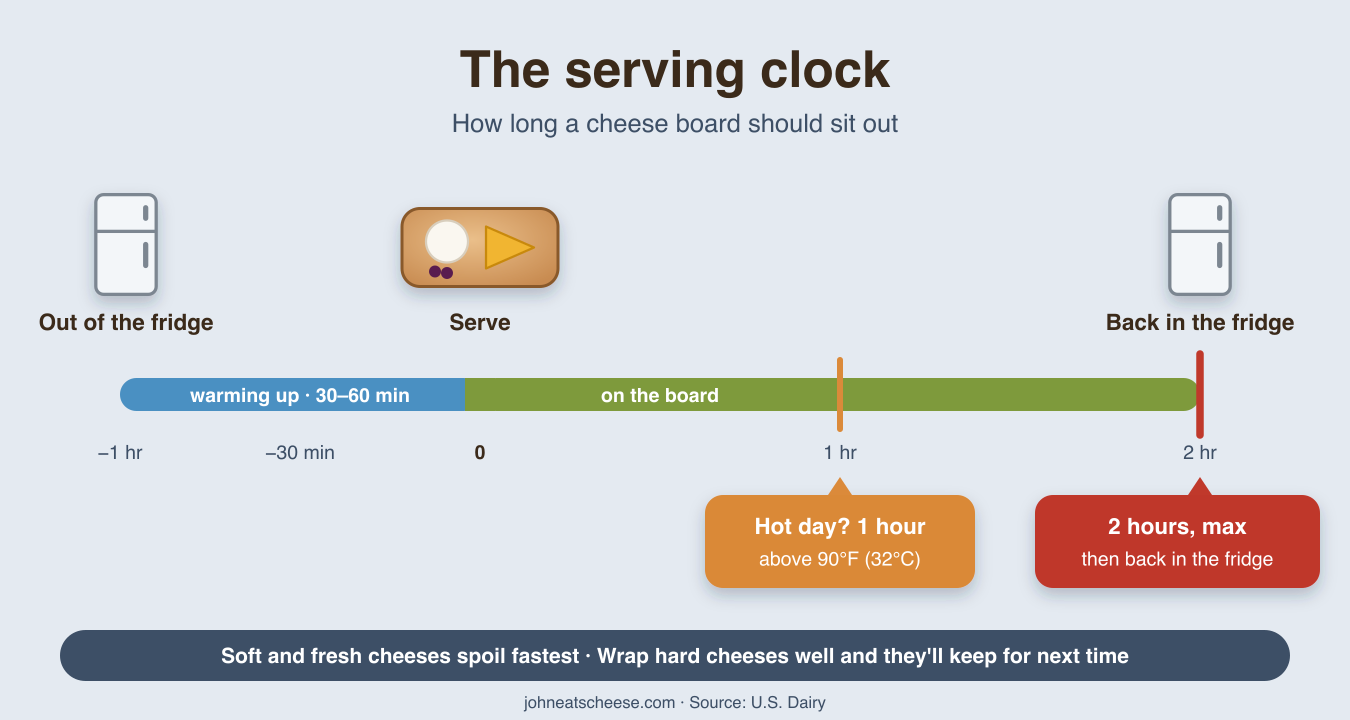
Don’t leave the board out for more than two hours, or one hour if it’s above 90°F (32°C), according to U.S. Dairy. Soft and fresh cheeses are the most perishable. Hard, aged cheeses hold up better and can be wrapped and put back in the fridge.
Wrapping up
Three to five different cheeses, about an ounce of each per guest, out of the fridge early, a knife for each and something sweet, salty and crunchy on the side. That’s the whole trick. When the party’s over, here’s how to store the leftovers. Looking for a drink to go with it? Try What wine or whiskey goes with cheese?